Fair warning, I'm going to be saying "balls" a lot in this post!
Look at these two gifs of Catz.
The cats appear to exist in 3D space. Balls and lines which are closer to the camera appear on top of balls/lines which are further away. Parts rotate around each other realistically. Body parts which are further away from the camera are shaded.
The technique for rendering them to screen, though, is very 2D. It's pixelly, the shading is flat, and the circles are clearly not polygonal approximations of spheres.
What's the easiest way to achieve this look without writing a bunch of maths to calculate 3D movements yourself?
Taking out perspective
Petz uses an orthogonal/orthographic camera. This means that the cat and its component parts are always the same size, no matter how close to the camera they are.
In this image you can see the blue sphere's size is equal to the red sphere's size in orthogonal mode, even though it is visibly further away in perspective mode.
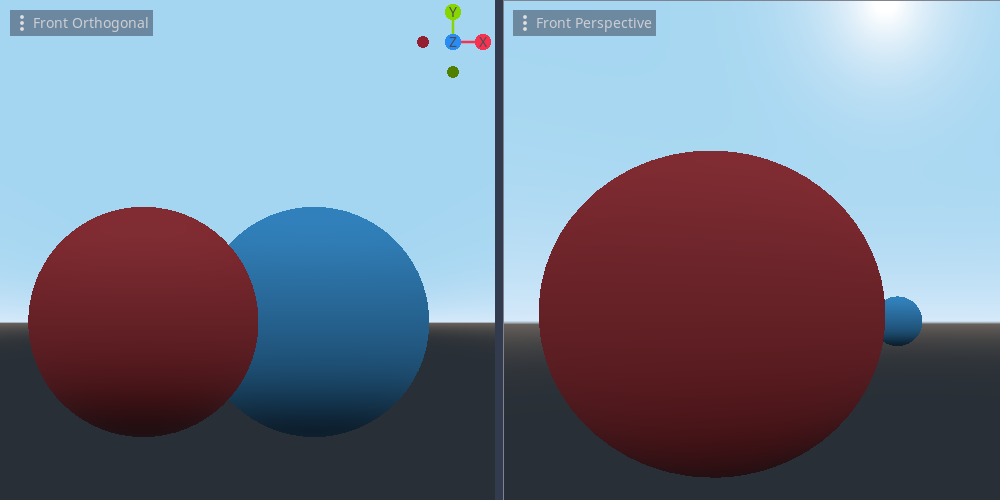
Using an orthogonal camera makes things a lot easier, since we don't have to deal with depth perception or the visual warping near the edge of the camera frame.
You can see here that in a perspective view, a sphere may appear ovoid at the edge of the frame depending on FOV.

Projecting to 2D
Now that we have an orthogonal camera, we can use it to 'project' 3D elements (like spheres) to 2D elements (like circles).
In Godot, you can use camera.unproject_position(global_transform.origin) to turn a 3D world point into a 2D canvas point.
This means we can simply place some Spatial nodes in 3D space, unproject their positions, and render 2D circles at those positions. Lines can be drawn in 2D between the two circle points.
The Z-index (i.e. draw depth) of the balls and lines can be set to ensure that parts closer to the camera draw on top. Giving a Z-index penalty to the lines will ensure they draw under the balls they're parented to.
This technique results in something that looks exactly like the Creature Creator 2D but can be rotated. A rotation of 3 unconnected balls is shown here.
Complex depths
The projection method gives results pretty much like the Petz game. But it also comes with limitations.
Let's say we want to implement an animation with a sidestep. Depending on the camera angle, the front legs of the animal might look something like this rubbish drawing:
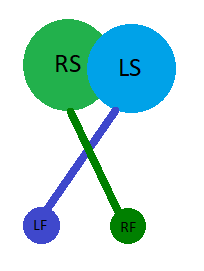
The animal's right shoulder is further away than its left shoulder, but its right foot is closer than the left foot because the right leg crosses on top of the left leg.
This presents problems for our drawing technique. Drawing the balls is easy enough, but what about the lines?
If we give the right leg a Z-depth beneath that of the left shoulder, then the right leg will incorrectly draw under the left leg.
If we give the right leg a Z-depth any higher than that of the left shoulder, it will incorrectly draw over the left shoulder.
In some games that might be correct or acceptable, but in the Petz games, a line should never draw over the balls it's connected to.
There are two possible solutions to this conundrum:
Give the line some knowledge about where the connected balls are drawn, so that the line can avoid drawing on top of them, but still draw over everything else. Note that this must involve knowing only where the connected balls are - we don't want to draw lines under all balls, since a line may correctly cross a ball further away in Z-space.
Use a real Z-buffer which can deal with a line having varying Z-depth across its length.
You could potentially use a stencil buffer for solution 1.
However, solution 2 gives you some other additional benefits.
Going full 3D
Let's ditch the 2D elements and go fully into the 3D space to use its Z-buffer.
This has the immediate benefit that all your work is done in the Godot 3D view - no more swapping between the 2D and 3D viewports.
It also means that you can easily set up multiple cameras looking at the scene from different angles.
We could draw our Petz with real spheres and cylinders. But achieving rounded shapes requires a fair few polys (nothing in comparison to what modern games use, but why be wasteful?). Using real 3D objects would also make it harder to achieve certain looks, like the pixellated 'fur' and outlines that Petz have at the edges of their body parts.
A plane/quad is the closest thing to 2D that you can get in 3D. What if we just put a bunch of planes in 3D space and draw 2D images on them?
There's only one difficulty. The planes must always appear to face the camera - otherwise the 2D elements would grow and shrink depending on camera angle. It would be obvious they were just drawn on planes. Not very convincing 3D!
Billboarding
Making the balls face the camera (regardless of which camera we're talking about) is easy. We can use a billboarding technique. You're probably familiar with this from old games like DOOM/Wolfenstein. The enemies and items are pixel sprites which rotate to always face the camera.
 from here

The lines are a lot harder. You can't use a standard billboard technique, since rotating the plane to face the camera changes the plane's start and end points.
The problem is clearer if the plane is projected into 2D space first.
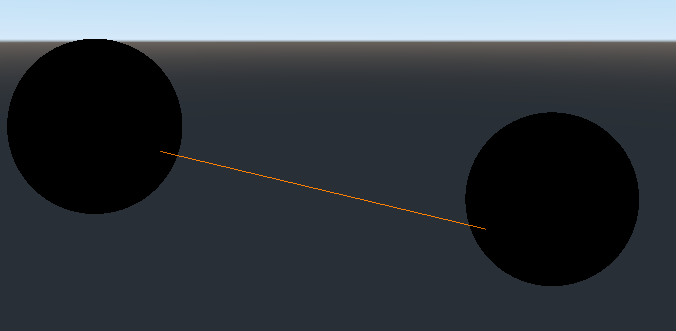
Given the orange line between the two balls, we know that we always want to expand this line to a certain thickness. To do that, we would have to move the vertices 'outward', i.e. perpendicular to the line's direction as seen onscreen. That is, not the line's actual local or world direction, but the direction that the camera sees.
If we can rotate the line correctly to point between the two balls (chortle, guffaw etc...), which can be done using Godot's look_at_from_position function, then all that needs to be done is figure out how to 'expand' the line in order to achieve this look:
This can be done using a vertex shader, and doing so means that multiple cameras will automatically be taken into account (you won't have to manually project per camera).
The short version is:
- Create a quad with near-0 width. Position/scale/rotate it so that there's a pair* of vertices at the start and end positions of the line in world space.
- Project the line into 2D via the camera.
- Figure out the projected line's normal (i.e. what vector is perpendicular to it in 2D).
- For each vertex, move the vertex's projected position along this normal (or the inverted normal, for vertices on the bottom of the line) by a certain amount.
This creates a line that always appears a certain thickness onscreen.
* in reality a quad may have more than 4 vertices, because it's two triangles, but the same principle applies.
See Drawing Lines is Hard for another description of this technique.
Then we can give each vertex a screen-space-Z penalty to force them to draw behind the balls. Because this works at the vertex level rather than the entire object level as with the 2D-projection Z-index method, the lines will always display behind their connected balls but will overlap everything else correctly.
Once the basic technique is set up, some final scaling has to be done to account for viewport aspect and zoom. We want the line to appear to exist in 3D space, so it must shrink and grow in terms of absolute pixel size as the camera zooms out and in.
In the demo above, you can see that zooming, shading and rotation can all be used with this technique.
See my project on Github for implementation details.