If this is your first time encountering transparency, you might want to look at the Transparency Showoffs page first!
Basic ball/paintball transparency
Making the bmp
- Take a photo/screenshot of your pet. Use a graphics editing program to measure the approximate size of the ball/paintball. If your bmp is way bigger or smaller than your target ball, it won't look right!
- Make a bmp that's slightly larger than your ball/paintball (just to leave some margin of error - otherwise you might see weird data at the edges of the ball!)
- Ensure that the bmp is INDEXED TO THE PETZ PALETTE. Just making it 8-bit/indexed colour isn't enough and may cause graphical problems in other people's games. Ask your local Petz community if you don't know how to do this!
- Fill bmp with magenta (index 253). This will be transparent in-game.
- Put whatever design you want in the center of the bmp. Obviously avoid using 253 in your design as it will become transparent!
Setting up the pet
- Make the target ball no-rotate.
- Make sure the texture 'transparency' setting is 0 if you don't want colours to change.
- Add the bmp to your textures section WITH THE EXACT SIZE OF YOUR BMP as the two values.
- So your texture line should look something like
\resource\textures\mytransparentbmp.bmp 0 32 32 - Apply the texture to your ball/paintball
In-game testing
- Make sure you actually have the transparency feature on in PetzA! This has tripped a few people up!
Limitations
- Transparency only works properly on balls with 0 outline and balls with 2+ outline.
- Transparency also works on lines, but only ones that are the same colour as the ball (-1 colour).
Advanced transparency: quadrants
PetzA can change the texture on a ball depending on what direction the ball is facing. This can be useful for things like wings or hair, which would otherwise only look right from one angle.
Making the bmp
- Determine what size your bmp needs to be as per the basic steps
- Make a bmp that's twice the needed size in both dimensions (so if your ball is 30px big, make a 60x60px bmp)
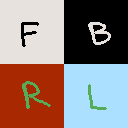
- Use the image below to figure out what to put in each quadrant. The F quadrant will be used when we see the front of the ball, B when we see the back of the ball, R the right, and L the left of the ball.
- Use the DIRECTION.pet sample above if this makes no sense (it probably won't the first time)
- For things like wings where you need two identical but mirrored textures, you'll have to make two bmps.
Setting up the pet
- Make the target ball no-rotate.
- Next to the ball number in the no-rotate section, add a 1 to indicate that the ball should use quadrants. So your [No Texture Rotate] entry should look like
92 1. Use the DIRECTION.pet sample above if you're not sure. - Add the bmp textures as per the basic instructions.
FAQ
My ghost pet looks weird with transparency on!
You probably have a pet with dithering, like Shenzai's phantom hound.
When PetzA transparency is on, all the dithering overlaps and looks funny. You'll want to actually turn transparency off when playing with these pets!
Can I make semi-transparent textures like glass with this?
No, actual semi-transparency isn't possible with bmps. But you could use dithering or a 'shine' stamp on a transparent ball to make a ball look like glass. This glass helmet by queenie is just a transparent ball with an outline. See more examples of tranparency in the Transparency Showoffs page.
Can I use this on clothes?
It seems like no-rotate is a difficult issue on clothing. You have to define no-rotate on the pet, on the base ball that will take the clothing. Unfortunately there's no way to define it on the clothing item itself. This makes most uses of transparency impossible, but you should still be able to do something like a lacy semi-transparent texture or something that doesn't need to no-rotate.